
How to Make a Worm Condo


Vermicomposting
Easy steps to building your own indoor worm composting bin
Supplies
- Large Durable Plastic Bin – 17 Gal. Tough Storage Tote in Black with Yellow Lid
- Vents – 2″ Round Screened Vent – tab style, black – bag of 6
- Drill
- Bi Metal Hole Saws Kit. Universal Arbor and Carrying Case, 3/4 in. to 2 in. Bi-Metal Hole Cutter (9-Piece)
- Uncle Jim’s Worm Farm
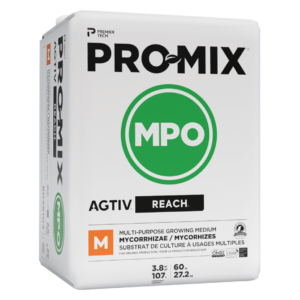
- PRO-MIX® MPO AGTIV REACH®

Step 1
Measure location for the vents
This step matters. Place the vents slightly above the halfway mark on the bin. If you install them too high, the bottom will not get enough airflow when the bin is only partially full. If you install them too low, compost can block the vents. Blocked vents stop airflow and trap excess moisture inside the bin, which creates odor and slows decomposition.

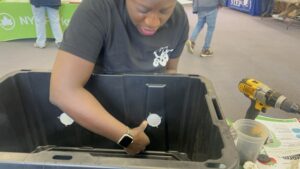
Step 2
Drill holes for vents
You only need one special tool: a hole saw drill bit that matches the size of the small end of the vent. The tighter the fit, the better. You can buy one at a local hardware store for a low cost.
If you don’t have a hole saw, use small, standard drill bits instead.
Place the vent where you want it and trace the circle onto the bin. Use a small drill bit to drill a series of holes inside the circle. Keep the edge of the bit just inside the line—do not drill over it.
After you drill holes around the entire circle, use a utility knife to cut along the line and remove the circle.
Vents can be added to the lid as well. Depending on where you place your bin, and how active it gets, you can always add some later, using these same steps.
Step 3
Install The Vents
Then just push them in, and your done. You can add vents to the sides as well.
Place your bin where it works best for you, and watch how active it becomes. If it needs more airflow, add additional vents later using the same steps.
Final
Bedding
Multi-purpose growing medium
Ingredients:
-
- Sphagnum Peat Moss (60-70%)
- Coir-Horticulture Grade
- Perlite
- Calcitic Limestone
- Wetting Agents
